Pages

All Are Invited! Upcoming Twitter Chat with Author Taylor Mali!


Feel free to join the #D100bloggerPD crew on Twitter next week! We will be having a live chat with author Taylor Mali on Tuesday, June 28, 2016 at 8PM CST. All are welcome to join in the conversation. If you are active on Twitter, just log in and follow along with the hashtag #D100bloggerPD. The questions are below.
 The Twitter chat is taking place to jumpstart the #D100bloggerPD crew's upcoming study on Mali's book, What Teachers Make: In Praise of the Greatest Job in the WorldThe kickoff will start right here on Literacy Loving Gals beginning Thursday, July 21, 2016 and will continue every Tuesday, Wednesday and Thursday through August 11, 2016. Hope to see you in the Twitter-sphere! 

P.S. Below is Taylor Mali performing his poem What Teachers Make.  


Conference Recap, Part 2: The Three Components Defining 'Readers as Thinkers'

Welcome back for Conference Recap, Part 2 discussing the three components defining 'Readers as Thinkers'! This post touches on reader voices, what it takes to make an inference and the Close-Reading framework. If you missed Part 1: Defining the Reading Range, and are interested in taking a peek, click HERE.


Three Components Defining 
'Readers as Thinkers'

Component 1~ Reader Voices: Reading, Thinking, Distracting
Looking for ways to make the reading process more concrete for students? Model the voices readers hear via "think aloud lessons" using Reading Voice, Thinking Voice and Distracting Voice signs signaling which voice you are modeling. Explicit think aloud lessons help students develop their own ability to monitor thinking while reading, which, in turn, enhances their comprehension. When I attended the Smekens Literacy Retreat last summer, I purchased the Reader Voice signs in the picture below. They have proved to be useful visual cues for my kiddos. (To purchase your own set, click HERE.)    
I absolutely love reading Elephant and Piggie books. They have such cute story lines and delightful characters. Kristina discussed this series as being a valuable tool for modeling reading and thinking voices, since the stories often show thought bubbles and speaking bubbles coming from the characters. 
Have you encountered students who believe reading relates to speed? Yes, it is true the more fluent of a reader, the better the comprehension. However, students who are *Nascar readers*, as Kristina explains, tend to read at full speed, but are not grasping the concepts or gist in their texts. They say, "I wasn't thinking, I was reading!" These are the students needing teacher support. Explain to students how good readers read a little, stop and have a thought. Then, read a little more, make a connection, a prediction and/or ask a question. Tell students the reason teachers ask questions and stop so often is to get students to think! :)

Having *reading thoughts* is part of reading, but this needs to be explicitly taught. Teachers must model reading thoughts! Teaching writing is no easy task, but it has a product and is visible learning for teacher and peer feedback. Reading, on the other hand, is more difficult to teach because it is invisible. Good practice is reading a page or two aloud to students, tagging stopping points about confusing vocabulary, questions you have and/or predictions that got answered because it allows students to see reading as visible process.  
Advice for teachers: DO NOT READ ON MUTE! Read, pause, retell, read, pause, think, ask questions, etc. out loud in front of students. Modeling this process and naming the voice being used (thinking voice, reading voice, distracting voice) is crucial.  Explain to students, 
"When you hear your distracting voice in your head, such as 'Boy, I'm getting hungry.  I wonder what's being served for lunch today?', you must turn that distracting voice on MUTE. Your thinking voice must tell your distracting voice to STOP. Your thinking voice must then apologize to your reading voice. Finally, reread your text to start thinking again."
To be honest, I have loads of conversations in my head. Though, most are unproductive and not worthy of sharing, it's nice to know I'm still sane. :)

Component 2~ Inferring and Making Inferences: What does it take to make an inference?
What does it take to make an inference? Having thoughts, of course! Tell students, "The conversation in your head means you're making inferences.  Take the text clues from your background knowledge and partner them up with new information. This equals an inference." Kristina claims there is no need to teach the skill of making inferences in a separate lesson because inferring can be taught in the middle of ALL lessons. In order to make this abstract idea become more concrete for students, Kristina recommends using hands-on manipulatives.

Kristina used the example of velcro representing background knowledge and new ideas, along with a small backpack of some sort representing schema. These items can help make the concept of inferences more tangible for students. She purchases a small amount of velcro, as well as mini backpacks or cell phone cases for each student

**Disclaimer: Before I begin this next paragraph, I must forewarn you I will probably not do this concept justice. Kristina has a way of flawlessly presenting the information. I've laughed to myself trying to make the following information sound coherent, but the struggle is real, people. Nonetheless, here I go. ;)
**As we all know, velcro has a smooth side and sticky side. Try (like I'm doing right now!) to explain to students to connect the familiar (background knowledge/sticky side of velcro) to the unfamiliar (new information/smooth side of velcro). New information sticks to nothing (smooth side of velcro) unless you rely on your background knowledge (sticky side of velcro) pulled from your brain backpack (schema). Tell students, 
"Connect what you know with what you don't know. Open up your brain backpacks, pull out and reference your background knowledge to stick it to the new learning. Then shove sticky velcro/new knowledge into your backpack. When you go to read, you have knowledge to stick it to using the reading and the thinking voice."
**Hopefully, you're able to understand the whole velcro analogy and how it relates to making inferences. Moving on! 

Kristina remarked on the importance of teachers needing to make time during class to allow students to turn and talk with peers. A suggested activity is to have students talk to a partner with toilet paper tubes (cheap and easy to acquire!) to whisper "thinking" thoughts. The picture below was used at the conference as an example. 
Another suggested idea was to create an anchor bulletin board for reading strategies which is comprised of snapshots of picture book covers read to introduce the particular strategy. The snapshots serve to trigger the lesson for the kids.  As an example, the black and white book covers next to two of the strategies are shown below. 
Overall, you must model how to read and replace students' current thoughts of *being on mute* with what good readers should be thinking. Teachers need to slow down to speed up. Slow down and model for students, so they can speed up throughout the rest of the year. These activities will definitely support their use of metacognition. 

Component 3: Close-Reading Framework
Last, but not least, is the close-reading framework. To better visualize the framework, envision a ladder that climbs down into a deeper and deeper part of the pool. The framework is only applicable to complex texts and should be taught early in the year. Realistically, students may participate in close-reading approximately two to three times per month, NOT daily!  

There are 3 PHASES of reading. This does NOT necessarily mean reading a text 3 times. Kristina states it may require students to read a text up to 4-6 times. The following images were given to attendees at the conference.

Phase 1: Determine what a text says
Bloom's Level of Learning: Knowledge & Comprehension 

Phase 2: Determine how text says it

Bloom's Level of Learning: Application & Analysis

Phase 3: Determine what the text means

Bloom's Level of Learning: Synthesis & Evaluation

The first read is always reading for the gist or the WHAT of the text. 
The second read is for craft and structure or the HOW of the text.
The third read is focused on the author's style and topic or the WHY the text matters. 
I picked up the resources in the picture below at the conference to help me better prompt my students and cue them on the 3 phases of close-reading with visual reminders.
Teachers should target reading skills in isolated comprehension mini-lessons followed by frequent close-reading experiences. Students need to be able to juggle reading skills, as well as their own thoughts/inferences, to fully comprehend a text. The best way to achieve this is to briefly teach every strategy at the start of the year and then build onto each strategy throughout the year using a year-long bulletin board. The bulletin board serves as a record of your lessons. 

As an example, Kristina mentioned creating a bulletin board filled with umbrellas and raindrops.  She stated, "Add an umbrella for every comprehension strategy and then add raindrop skills all year long."  When working with students, she introduces each umbrella's comprehension strategy at the start of the year. As the year progresses, she goes into more depth by adding reading skills represented on the raindrops that fall under each comprehension strategy.  Kristina doesn't teach the skills in any particular order and prefers to jump around basing the skills on the texts she chooses. If you're in a 1:1 technology district like me, an option is to create a digital bulletin board for students to reference throughout the year with Padlet! 

When teaching any skill in isolation, always use EASY text so students can focus on the skill without juggling text complexity. Never start with complex texts. Teach a few skills before jumping into a complex text.  For example, teach students how info-graphics add information beyond the text before having them read a complex text that is comprised mostly of info-graphics. Ultimately, if the six comprehension strategies are a big portion of your instructional foundation (which they should be), consider making them part of your physical space.

Well, there you have it. Hope you learned something new! I'll be back soon for Conference Recap, Part 3: Mini-Lesson Ideas for Reading Strategies.

Happy Wednesday!  

Conference Recap, Part 1: Defining the Reading Range- What Makes a Text Literature, Literary Nonfiction and Informational?

Have you ever been to a workshop hosted Smekens Education Solutions?  They're worthwhile, for sure.  In the summer of 2015, I attended my first Smekens Literacy Retreat with Kristina Smekens as the presenter and acquired a great deal of practical and valuable information that can be implemented into the classroom straightaway.  If you're interested, click HERE to access my Literacy Retreat mini-series breaking down the eight sessions I attended. There are free resources within the posts! :)  

Anyway, I'm back to share an assortment of things I've learned from another phenomenal workshop with Kristina Smekens.  Prior to registering, her workshop claimed to provide the skills and motivation teachers need to keep reading instruction both purposeful and dynamic for students.  After attending, I must say the all-day workshop did not disappoint.  

I was blasted with so many steadfast suggestions and innovative mini-lessons to better scaffold students, as well as grab and keep their attention, that I've decided to break up the content shared at the workshop into three parts, instead of having one never-ending blog post.  
  1. Part 1: Launching the School Year- Defining Reading Range & Text Types
  2. Part 2: Three Components Defining 'Readers as Thinkers'
  3. Part 3: Mini-Lesson Ideas for Reading Strategies
This post is Part 1.  It offers suggestions for launching the school year, which includes defining the reading range for students and determining what makes a text literature, literary nonfiction and informational.  When Part 2 materializes, you will learn more about the three components that define 'Readers as Thinkers', which encompasses reader voices, what it takes to make an inference and the Close-Reading Framework. Finally, in Part 3, I will share a handful of the mini-lesson ideas for Recalling, Retelling & Summarizing (as well as establishing the difference between the three), Determining Main Idea, Visualizing Ideas, Asking Questions, Making Connections and Synthesizing.  Like I said, I was blasted with so much information!  Okay, moving on with Part 1. :)

Suggestions for Launching the School Year:
Think about your reading experiences as an adult. You probably read a variety of undemanding reads such as magazines, recipes, novels, etc.  However, when the time approaches, you may also be required to make sense of more laborious reads, such as tax forms during tax season, policies, insurance documents and so on.  As adults, it's real life to read a variety of texts.  Bringing in some of your authentic samples of *easy* and *hard* reads at the start of the year for students to view firsthand, gives them a preview of what's out there.  

After establishing your procedures and routines for Reading, Kristina suggests starting off the year by explaining to students what they will be reading, which encompasses *easy*, *hard*, and multimodal texts throughout the year. (Click HERE for more information on multimodal texts.) These varieties of text types will be read for differing reasons because that's real life. Cautioning students to expect easy days and hard days makes for a nice transition into teaching them how to persevere through the harder texts (Close-Reading).  This is crucial because students will encounter difficult texts inside and outside of the classroom, without a doubt.  
Defining the Reading Range: Literature vs. Literary Nonfiction vs. Informational Texts
Along the same lines, it is essential teachers discuss the parameters of literature, literary nonfiction and informational texts.  Helping define the range of reading for students is a necessity.  Kristina states, "No longer can we simply refer to something as fiction or nonfiction. The CCSS requires us to distinguish literature, informational text and literary nonfiction- and engage our students with all three."  Below are the comparative features for each text type.  If you click on the image, you can download a copy for yourself. 
Characteristics of Literature:
We usually refer to Literature as fiction.  Kristina affirmed literature comprises the following: 
"It includes made-up characters who overcome problems and resolve conflicts. It encompasses picture books, short stories, fables, fairy tales, legends, folk tales, chapter books, historical fiction, realistic fiction, sic-fi, novels, poetry, and plays/dramas." 
Characteristics of Literary Nonfiction:
The big difference between literary nonfiction and informational text is how facts are revealed.  Kristina indicated:
"These texts read more like literature, but all the information is factual. Think of it like a hybrid. Authors of literary nonfiction engage readers with their lively narrative voice, weaving facts with details that appeal to the reader's emotions and make the subject come alive.  These include biographies, memoirs, documentaries, essays and speeches."
Characteristics of Informational Texts:
Informational text is read for the purpose of gaining knowledge. Kristina referenced informational texts with the the details below: 
"By nature, this text is of a higher text complexity with specialized vocabulary specific to the topic, heavy doses of facts, and numerous text features.  These texts include text books, primary source documents, newspaper articles, etc."
Teaching the Differences:
To teach the differences between the text types, introduce students to a specific topic using a piece of literature, a literary nonfiction text and an informational text.  Assist students in comparing how the topic is treated in each text.  The topic of turtles was brought up at the workshop.  Teachers may, for example, choose the books below to introduce the topic of turtles to students. 
Literature Example
Literary Nonfiction Example

Informational Example
After selecting texts, help students inspect the differences between the texts.  For example, point out the text features. Informational texts usually contain bold/italicized print, labels, diagrams, charts, captions, photographs, subheadings, and more. However, literature and literary nonfiction tend to include chapter titles, page numbers and illustrations.  Explaining to students how authors include specific features to help readers better understand the text or to convey information is important.

In addition, make sure students are familiar with the various structure of texts.  In Stephanie Harvey's book, Nonfiction Matters: reading, Writing, and Research in Grades 3-8, she states,

"Understanding the expository text structures gives readers a better shot at determining important information when reading nonfiction...If students know what to look for in terms of text structure, they grasp the meaning more easily."
Literature is less complex to understand because the structure is always chronological.  However, when students are reading informational texts, they need to be able to identify which of the seven types of expository structures they're reading.  This makes reading informational texts much more complex!  


To more sensibly prepare students to be successful readers, teachers need to start or remain explicit in teaching the necessary skills to better comprehend the different types of texts.  I'll end this post with a quote from Kristina Smekens: "As we are teaching the Common Core Standards, we need to do more than just read the different types of text. We need to teach their similarities and unique differences side by side."

I am hoping the information in this post is worthwhile to someone. I never really know who is actually reading my posts, but I'm hoping the time and effort I put into writing them isn't going to waste. :) Nonetheless, I will be back sometime soon to share more in Parts 2 and 3! 


Happy Friday.


Using Beads in Reading RtI for Some #TLAP

Good morning! After attending the Teach Like a Pirate conference last week, I spent the weekend looking for things that can add some spark and creativity to my classroom lessons.  I learned from and laughed with Dave Burgess over the things he does to engage his students.  He commented, "Everything is better with tights!", meaning dress-up and get into character. :) One of my biggest take-aways was his mention of creating a "capture system" for creative ideas.  He said to write all of your ideas down.  Then, of course, test them ALL out!  What's the worst that could happen?
So, here I am, trying out some new ideas.  I'm seeking some suggestions for the use of these beads in the picture, so I figured I'd get some support from my blogging pals.  The beads are my *new* $1.99 thrift store purchase to add to my classroom goodies.  After having twins, our playroom at home was overly stocked with toys, including beads, but I wasn't quite in the mindset of using the toys for other purposes.  I just wanted to clear the clutter, so most of our belongings have already been donated. Bummer. However, I thankfully have a new mindset!  I came to the conclusion the beads could bring a little #TLAP or 'novelty' to my RtI reading lessons.

Some possible uses I've already brainstormed include using the beads as representation for recalled details or facts from a text, sequencing of events, proof/text evidence to support answers, and character traits of main characters. Does anyone else have other thoughts or tips for using this toy to support reading skills or growing as a reader?  Please share with me! I'd greatly appreciate it and thanks in advance!

P.S. At the end of the conference, I was given a #TLAP bracelet to serve as a reminder to bring curiosity and excitement to learning on a daily basis. Love it! :)
Happy Monday!

Amplify Your Instruction with Kristin Ziemke and Katie Muhtaris!

Good morning! If you weren't already aware, my school district participates in biweekly Twitter chats using the hashtag #D100chat. I love participating in the chats because they promote professional growth as an educator and bring the colleagues in my district closer together. As you know, collaboration is viewed as one of the keys to success! Our Twitter chats focus on a variety of topics, including district-wide professional book studies, content-area literacy, ELL resources, SAMR & TPACK, genius hour, CCSS math practices and more.  

I know it's late notice, but our next chat is today, May 3rd! The topic is all about amplifying your digital learning and instruction. Can you guess who our guest moderator will be? Kristin Ziemke!  Katie Muhtaris and Kristin Ziemke wrote the book Amplify: Digital Teaching and Learning in the K-6 Classroom.  If you don't own it, I highly recommend the purchase. It's filled with tons of useful tips, tech resources and great pedagogy.  


A group of teachers in my district decided to try some ideas from their book to prepare for the upcoming chat.  The book has specific sections called Three Things to Try Tomorrow. The ideas in these sections are easy-to-implement and could dramatically enhance our teaching and students' learning. Why not give the ideas a try, right? If you feel you're not a "techie" kind of teacher, don't fret. You don't need to be when putting these purposeful ideas into practice!


The Challenge: Try Something!
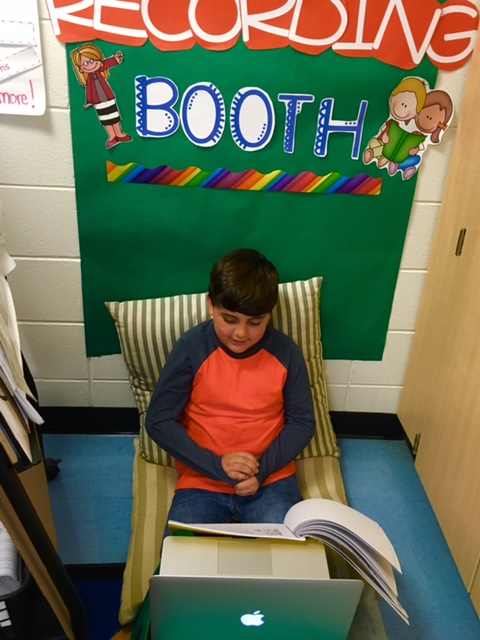
I decided to try two *somethings*, but I have a feeling, little by little, more and more ideas will be incorporated into my class. In recent weeks, I've created a Recording Booth and Digital Bulletin Boards for my students. Both of these ideas are found in the first chapter of Amplify. According to Ziemke and Muhtaris, "A class recording booth is one of the easiest ways to capture student thinking. You can create a recording booth with practically any device... Once you have a device, find a quiet corner in your classroom and start recording!" It truly is that simple. Really!

The digital bulletin board is considered any digital collaborative space you create for students to gather feedback or allow interaction among each other. There are a variety of options, but Padlet was mentioned as a favorite by the authors. Padlet is a purposeful tool that can be manipulated by students with ease. As mentioned in Amplify, "Padlet walls support images, videos and links."


The Lesson:
Since my students are already used to recording themselves in my room, I thought adding a makeshift recording booth would be simple enough. Generally, my students find a spot in the room to record various tasks, such as book trailers for their books (accessed through the use of QR Codes), their thinking about what they're reading, and even themselves reading books aloud to reflect on their fluency. The step-by-step introduction and modeling of how to record oneself was launched at the start of the year, so I was able to quickly move through the suggested tips by Ziemke and Muhtaris. Because I am in a 1:1 district, K-5 students have become well aware of the procedures for recording themselves. The management piece isn't a big focus for me, since I provide interventions for groups of 3-4 students at a time. However, two of the suggested starting points from the book are:
  • Start by modeling for students what the video should look like.
  • Add supports like a chart depicting how to start, record and stop the camera. 


For the digital bulletin board, Padlet is a great way to go.  I've been using Padlet (as well as TodaysMeet) with my students for a few years now with different intentions in mind.  Amplify gave me additional ideas for using this platform with students, such as shelfies.  Students post comments on the Padlet wall about what they are reading.  This idea ties into Donalyn Miller's  Status of the Class, where students are held accountable for independent reading.  As Miller states in her book, Reading in the Wild,  "Students practice discussing books in concise, low-risk ways; Everyone reads, everyone shares; Students hear about many books they may potentially read."  The same goes with the Padlet walls!  The images below are from our "What are you reading?" and "Padlet Pride" digital boards.  
My Reflections:
As I reflect, the recording booth was a *bestseller*, in the eyes of the students. They smiled when seeing the sign leading to our makeshift booth, as well as enjoyed the comfy pillows and colorful, green-screen background. I intend on upgrading the booth little by little with a shower curtain and other welcoming details mentioned in the book. If you don't already know, I share a small room with our talented Literacy Coach and part-time Reading Specialist, Courtney. She also pulls kids at the same time as me, so our room can get a low roar of voices at times, but nothing that disrupts the students' learning. Having the recording booth area dedicated in a space removed from other students has been very helpful. Nevertheless, I'm looking into an attachable microphone for the recording booth device, to help improve the sound quality of students' recordings.

The digital bulletin board is a fun way for the students to get ideas and inspiration from their peers. The students are loving the Padlet walls. Even though it's a digital board, I printed out a set of the students' shelfies for the passers-by in the hallway.  Yes, I decided to go *old school* this time and print their shelfies on paper (no throwing rocks, please!). Of course, digital bulletin boards can be shared with others via Schoology, Google documents, or even through the use of QR codes.
Your Turn to Take the Challenge!
Do you integrate tools into your classroom that enhance instruction while using technology, either from Amplify or beyond?  Or do you want to try creating a recording booth for students to document their thinking and/or share their favorite books like I did? How about testing out a digital bulletin board with your students?  We would love if you share your idea with us, either on your blog, by adding a quick idea to our Padlet Wall or linking up below!  We will officially challenge our district (and YOU, if you're outside of Berwyn South District 100) after the #D100chat on 5/3/2016, but you are free to take a sneak peek!

Happy Tuesday!


Related Posts Plugin for WordPress, Blogger...